This post describes a way to sniff packets and inject them in a network using some easily available tools. This will hopefully demonstrate in a simple fashion how the TCP/IP protocol works. What is described in this post cannot directly be used to do anything malicious as it is a slow manual process. Actual real-time injection is used for things like Man in the middle attacks and would require scripting of tools like Scapy.
This post assumes you are familiar with the Hexadecimal Number System and have at least heard off the OSI model for communications systems.
This work was carried out with Jon Wasserman and Allison Burtch
##Methodology
To demonstrate how this works we’re going to use a simple network game made in Processing by Tom Igoe for a class at ITP running on localHost. The reason for this is to have complete control over the client and server side of the network and reduce the amount of noise when trying to decode this data in WireShark. If we were to do this over a wi-fi connection say, it would take more work to filter out messages that are being passed over the network that aren’t related to our tests.
Processing Ball Drop Game
The objective of the game is to use the paddle to keep the ball bouncing for as long as possible. Each player connects to the ballDropServer sketch using the ballDropClient sketch. Each client is represented as a paddle and the client sends messages like ‘u’, ‘d’, ‘l’, ‘r’ to control the paddles. Using Wireshark it will be possible to sniff the commands being sent from the client to the server. And with Scapy it is possible to inject packets and hijack the communication. In this demo we arent actually going to play the game but just use its infrastructure as a way to test these tools and techniques.
Ball Drop Server : This program listens for TCP socket connections and uses the data from the incoming connections in a networked multiplayer ball drop game. Ball Drop Client : Starts a network client that connects to a server on port 8080, sends any keystrokes pressed.

##Tools
WireShark: WireShark is a network protocol analyser that essentially reads all the traffic going over your network and decodes unencrypted packets providing them in an easy to read format. Scapy: Scapy is a an interactive packet manipulation program. It runs on python and one can use its interpreter to forge or decode packets of a wide number of protocols, send them on the wire, capture them, match requests and replies. So while WireShark is used to listen to the network, Scapy actually makes it easy to talk to nodes in the network. The easiest way to install Scapy I’ve found is to use macports on the command line. It downloads the libpcap and dnet libraries automatically which can be very fiddly to do manually. If you don’t have MacPorts installed, here is the official documentation. If you are on a Windows machine, follow Scapy’s documentation.
In terminal:
sudo port install scapy We can now use the BallDropServer and BallDropClient Processing examples which run locally on our machine. This means we are going to be eavesdropping on the lo0 or localhost network interface of our computer.
Demo
Okay, so with Scapy and WireShark installed we can start sniffing eavesdropping on the network. The first step will be to open Wireshark and start listening on the loopback port which is the localhost that the Processing server runs on. On a Mac, WireShark needs to be opened with XQuartz by navigating into the proper directory (generally Applications) and typing:
open Wireshark.app/ From the menu shown in the image select Loopback : lo0 as the interface.
Once you do this you should see new packet capture screen. Now run the Processing BallDropServer.pde sketch. As soon as it starts a you should see some traffic. This is the Processing sketch setting up the server. You might also be seeing some other traffic. To make sure we’re only watching the traffic from the Processing sketch you can add this filter in the filter text field:
ip.dst == 127.0.0.1


The next step is to run the BallDropClient.pde sketch. As the sketch name implies, this is the client sketch that acts as a controller in the game. So when this sketch starts running it will try and communicate with the BallDropServer.pde applet. Since we’ve set the server port as 8080, any traffic we now see with a destination port of 8080 can be assumed to be coming from our client.

In the image above the highlighted packet is being decoded by WireShark. From the line highlighted in red you’ll notice that:
The IP Protocol Src and Dst addresses are 127.0.0.1 The TCP Protocol Src port number is 50268 and Dst port is 8080. (The Protocol Src port number will change every time) We know that the server is set up to listen on 8080 so from that information we can infer that this packet has indeed been sent from the Processing client to the server.
To test this out further we can send commands from the client to the server and try and find the payload in Wireshark. This will also help us get more familiar with the packet structure.
For this example I sent the ‘u’ (for up) command from the client to the server. I could see it successfully reached the server as this clients paddle moved one step up in the game. Looking back at Wireshark we can now decode the packet to see if we can spot the ‘u’. When the command is sent you should see two new packets come up.

The first is the actual data being sent to the server, the second is the ACK (acknowledgement) from the server to the client.
If we decode the first packet we should see the ‘u’ we sent.
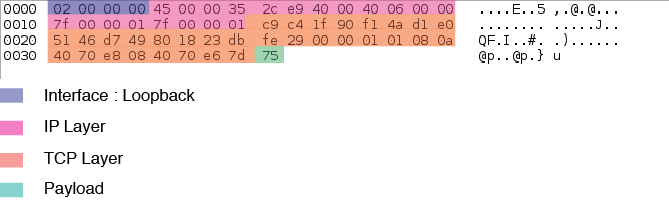
##Packet Breakdown
This is the packet sent from the client to the server. The different color blocks represent the different layers of data being transmitted. WireShark decodes this for us to make it easier to read. To understand the protocols in detail it would make sense to look at all the fields in there. But for now we can just do a general overview to understand the basics.
Interface : This described which physical interface are we talking over. The options include, ethernet, wifi and loopback. As we are running the server on the local host we don’t need to configure the physical interface. It is set up for localhost by default. IP Layer: This describes the IP layer for the packet. The information transmitted here has the length of packet, src and destination IP addresses, what protocol over IP is being used i.e TCP, UDP etc. We can look at this packet in a little more detail too.
0x7f 00 00 01 : This hex value directly translates to 127 0 0 1 which is the src and destination IP address. This is why that number comes up twice in the packet. TCP Layer: The next block is the TCP layer. The first 4 bytes have the source and destination ports.
0xc9 0xc4 : This Hex value translates to 51625 in the decimal number system. This is the src port, in this specific case the client port. 0x1f 0x90: This Hex value translates to 8080 which is the destination port, again in this specific case that is the port the server is listening on. Payload : And finally we have the payload! This is the actual data we wanted to transmit, since we are only transmitting the value ‘u’ it is one byte long and 0x75 is the ASCII value for ‘u’. This is further verified by looking at the last byte of the ASCII encoded packet on the right hand side of the image.
Packet Injection
So that’s great, by this point we have managed to look at the data being sent from the client to the server and decode it at the packet level. Now comes the fun part of trying to hijack this communication and send our own packets to the server acting like the client. This is where Scapy comes in. Scapy allows us to create packets on the fly to mimic what is being sent from a client to a server or vice versa.
In order to do this we first need to get a bit more familiar with the TCP/IP three way handshake. This will allow us to intelligently insert packets and fool the server into thinking it is still talking to the client.
This blog post on packetlife provides good information on how this system works. In essence,
“TCP session maintains a 32-bit sequence number it uses to keep track of how much data it has sent. This sequence number is included on each transmitted packet, and acknowledged by the opposite host as an acknowledgement number to inform the sending host that the transmitted data was received successfully.”
So if we want to send the server forged packets we need to have the following information. (The values in the parentheses show what it should be for this example.)
Destination IP address : This is the IP address the server lives on (127.0.0.1) Destination Port : This is the port the server is listening on. (127.0.0.1) TCP Src Port : This is the open port on the client (51625) TCP Dst Port : This is the open port on the server (8080) And now we simply have to create the packets. Scapy makes this very easy by wrapping the different layers into objects. Since we are working on the localhost we don’t need to worry adding the Interface (i.e physical layer, it is lo0 by default).
To run scapy simply go to the terminal and type sudo scapy. You should get a screen that look like this
Now, using the scapy command line we can create the IP and TCP objects. For a full reference on scapy here is the latest reference documentation I found. This tutorial on the creating IP and TCP packets and using the send receive command was also useful.
To create the packet we first create the IP object using the IP layer information we sniffed on wireshark. In this case it is the src IP, dst IP.
ip = IP() ip.src = ‘127.0.0.1’ ip.dst = ‘127.0.0.1’ I also set the flags to the Don’t Fragment setting (0x02). So in this case:
ip.flags = 0x02 We then create the tcp packet:
tcp = TCP() tcp.sport = 51625 tcp.dport = 8080 //This sets it up for the right flags for the tcp protocol, because we need to keep it open. TCP normally closes things.
tcp.flags = 0x018 //to see your setup ip/tcp And here is the tricky bit, a tcp connection contains sequence and acknowledgement numbers that allow the client and server to stay in sync. For a good explanation as to how it works I recommend this link. But the gist of the matter is whatever sequence number we receive we have to set one higher in the packet we are creating. This makes the server think we are the client.
Luckily WireShark decodes this packet and provides us with this information. The important thing to remember though is that WireShark is only showing us the relative sequence number, i.e that it decodes the sequence number further and only show us what is relevant for the current connection. However if we want to send fake packets we need to transmit the actual sequence number not the relative one.
This can be seen by highlighting it in WireShark and converting the hex to an int in python.

And then in scapy you can add it like so
//these numbers will be different for you
tcp.seq = int(‘aa0a3a8f’,16) #If the number you saw in wireshark was aa 0a 3a 8e tcp.payload = ‘d’# sending the down command to the game And for the last command keep the server applet open and the terminal window open at the same time
send(ip/tcp)
If all went well, you should have seen the paddle move down one step. This video below demonstrates how all this should work. In the video the terminal application hijacks the connection between the Processing client and server and send commands to control the paddle.
So thats it, we successfully managed to intercept the communication between the Client and the Server and send data to the server impersonating the client. This is the equivalent of someone hijacking the communications between your browser and the gmail server and requesting the server for your email. However, that has securities and layers of sophistication higher up in the OSI stack. This just demonstrates how it would work at the TCP/IP level.